Azure ML Pipelines
This builds on previous post introduction Azure ML Pipelines. Below assumes that Azure ML Workspace has been created, initial virtual environment and azure-sdk dependency installation as been completed. Additionally config.json file needs to be downloaded from ML Workspace and placed in .azureml folder in project root directory.
Repository of code can be found here.
Building an Azure ML Pipeline
We will create a “typical” machine learning pipeline that will consist of the following steps:
- Retrieve a data-set from blog storage
- Add a classification feature to the data-set (0/1)
- Create and persist a classification model
Overall I found the Azure ML Pipelines API to be fairly straight-forward but also very low-level. Because of the low-level nature of the API there are several aspects which seems to drive poor development practices that annoyed me:
- The common PythonScriptStep often requires duplicative input and argument parameters to pass values to the script to be run
- The PythonScriptStep encourages (via examples) the use of code dumped into main
- Almost all examples are via in the context of a Jupyter Notebook
- Pipelines can not be run locally which can make debugging more challenging that it should be
A future post will cover these additional topics:
- How to create a more descriptive approach to creating Azure ML Pipelines with a novel Framework
- How to debug individual steps via unit-testing locally
- How to use additional ML Pipeline metric logging (beyond print statements)
Loading a Data-set
There are multiple ways to load an initial data-set for Pipeline integestion. In this case I went for the simplest approach and used the ML Workspace UI to manually upload and name a reference data-set.
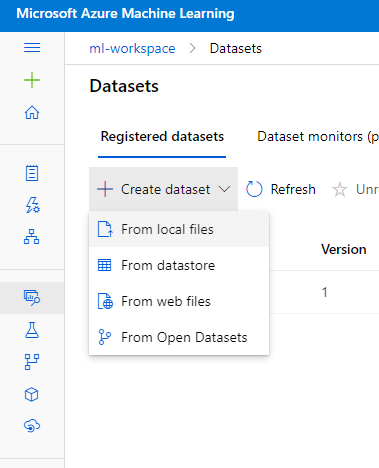
The data-set used was via https://archive.ics.uci.edu/ml/datasets/Wine+Quality as .csv and named “wine-quality”.
There is an example of programmatically uploading and registering a data-set within the test_pipeline.py via the LocalFileSystemProvider implementation.
Create Enviroment & Compute Resources
One of the cool things about Azure ML Pipelines (and cloud computing in general) is that you can disconnect dependencies of the code from the executional environment. A typical PythonScripStep would entail the following:
- Environment - encapsulates the dependencies required for execution either via Pip (requirements.txt) of Conda (conda.yml). These get built into a Docker image that is cached for re-use.
Environments don’t seem to be visible in the Azure ML Studio UI. However you can view them via the VS Code Azure ML Extension. Additionally M$ has a few pre-built (“Curated”) environments that enable faster initialization as they don’t require Docker build steps.
- Compute Target - the specific computing resource that is used to execute the code. This is where the Docker image and the provided code are executed. There are 2 primary types - cluster & instance types.
Cluster resources can not be used for Jupyter Notebooks. For starting an Instance resource gives you a Pipeline deployment target that can also be used for Notebook exploration.
- The code - the code-base you indicate should be uploaded to the compute target + environment for execution. Consists of a folder (to continue referenced code) and an entry point (for main execution).
Utility functions for creating Environments and Compute Targets can be found here. Usage generally looks like:
# Get configured workspace from .azureml/config.json:
ws = Workspace.from_config()

# Set-up execution environment:
run_config = RunConfiguration()

# Get compute resource:
compute_name = "ml-compute-inst"
compute_target = AzureMLFactory.getComputeInstanceResource(ws, compute_name)
run_config.target = compute_target

# Get environment (dependencies):
environment_name = "ml-env"
environment = AzureMLFactory.getEnvironment(
    ws, environment_name, "src/pipeline-requirements.txt", create_new=False
)
run_config.environment = environment
The run_config object is then passed to pipeline steps to specify how to execute the step.
Create a Pipeline Step
The most commonly used pipeline step seems to be the PythonScripStep, which as name would imply is just an execution of a standalone Python module.
# Defining a PythonScriptStep ---------------

# For input - get named data-set:
dataset = Dataset.get_by_name(ws, name="wine-quality")

# For output - create a named pipeline data-set:
ds_processed_data = PipelineData(
    "ds_processed_data", datastore=ws.get_default_datastore()
).as_dataset()

# Specify the python script that will be run:
entry_point = "create_classification_target/create_classification_target.py"

# Connect all the elements into a step:
data_processing_step = PythonScriptStep(
    script_name=entry_point,
    source_directory="./src",
    arguments=["--output_path", ds_processed_data],
    inputs=[dataset.as_named_input("ds_input")],
    outputs=[ds_processed_data],
    compute_target=compute_target,
    runconfig=run_config,
    allow_reuse=True,
)
A few things to note:
- source_directory allows you to include the entire package tree so that your script can access locally packaged code. Keep in mind that this classpath may be different than what you have in your local dev environment.
- outputs have to be provided as both an input parameter (to mount the blob storage) and as an argument to the script via the arguments parameter (to provide the value to the executing python script via ArgumentParser()).
Create the python script to execute:
View script file here
A few things to note:
- output path is provided via the argument parameter - if value is being used as an output you will likely need to create the folder as it won’t previously exist.
Examples often have the script file as one really large main() function which is a poor development practice. You should develop a framework to more descriptively (aka less procedurally) develop your step logic. Compare these two implementations that do the exact same thing as an example: Bad - Better.
Recommended directory structure
I am fan of a directory structure that looks similar to the below:
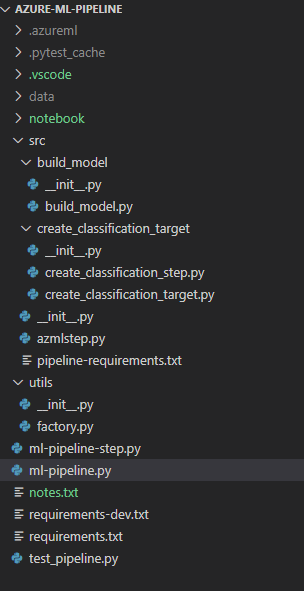
- .azureml - stores the config.json file for workspace connectivity
- notebook - used for exploratory notebooks
- src - used for code deployed to compute environments (i.e. pipeline steps)
    - [folder] - contains one specific step
        - [file.py] - the entrypoint to execute
    - pipeline-requirements.txt - dependency requirements for all steps (or one step if in [folder])
    - [modules] - other modules that are needed by the step script for execution (utils, frameworks, etc.)
- [modules] - modules used for assembling and building the pipeline (e.g. utils, etc)
- ml-pipeline.py - driver script that creates/updates the pipeline deployment
- requirements.txt - dependencies for pipeline creation (e.g. azureml-sdk)
- requirements-dev.txt - dependences required for development (e.g. black, etc.)
- test_pipeline.py - unit testing of pipeline steps
I highly recommend creating an approach to unittest steps locally. If you rely on remote debugging your development process may be significantly slowed down. There are ways to connect VS Code to remotely executing pipelines but I have not tried them yet.
Viewing pipeline status
If you run ml-pipeline.py you should recieve status updates into terminal that will allow you to monitor pipeline creation process. Additionally you can view the graph and status of your pipeline in the ML UI:

Clicking on a particular step will take you to the logs for that step which are your primary means of viewing step output (error messages and print debug statements).
Viewing step output
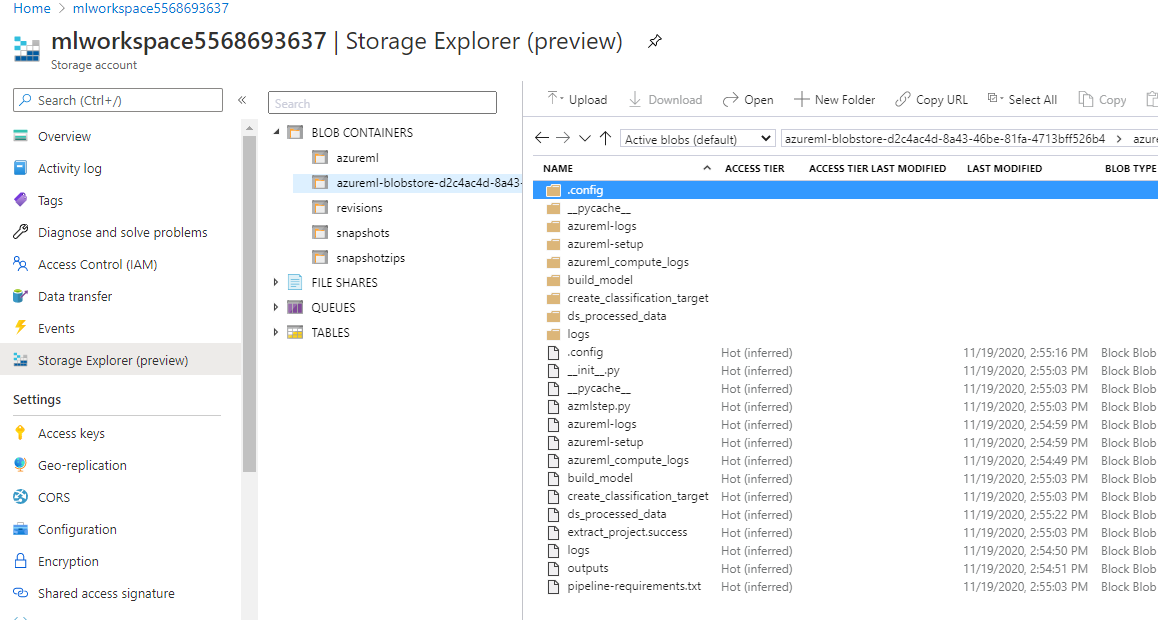
You should be able to view the intermediary files created during the pipeline by looking at the step outputs to resolve the directory paths to blobs used in Step execution. For example:
with arguments: ['--output_path', '/mnt/batch/tasks/shared/LS_root/jobs/ml-workspace/azureml/5be7effb-5c8b-4f42-8f74-150921c8685a/mounts/workspaceblobstore/azureml/5be7effb-5c8b-4f42-8f74-150921c8685a/ds_processed_data']
indicates where I can find the output location. I can then use the Azure Portal Storage Explorer (or another tool) to view the blob to confirm file output in the mlworkspace*** blob: